Bora Bora. Just the name conjures images of turquoise lagoons, overwater bungalows, and imposing volcanic peaks. But turning those mental pictures into stunning photographs that truly capture the island’s magic takes more than just a point-and-shoot. It requires understanding the key locations, the best times to shoot, and the techniques to translate the vibrant colors and dramatic scenery into compelling images. This guide dives deep into photographing Bora Bora, revealing the best spots and providing actionable tips to elevate your photography game.
Matira Beach: The Classic Postcard View
Let’s start with the obvious: Matira Beach. This is the quintessential Bora Bora beach, and for good reason. Its soft, white sand slopes gently into the calm lagoon, offering breathtaking views of Mount Otemanu. You can easily access Matira Beach by car, scooter, or even a leisurely bike ride from most accommodations on the main island. Public access is free, making it a photographer’s paradise without an entry fee.
Best Time to Shoot: Sunset and sunrise are magical here. The golden light bathes the lagoon in warm tones, creating silhouettes of the palm trees and Mount Otemanu. If you’re willing to wake up early, sunrise will likely be less crowded. For sunset, arrive early to secure your spot. Even during the day, the bright turquoise water and white sand offer excellent photographic opportunities, especially under a clear blue sky.
What to Shoot: Think wide-angle shots to capture the vastness of the lagoon and the imposing presence of Mount Otemanu. Don’t forget details – the textures of the sand, the reflections in the water, the patterns of the palm fronds. People add scale and interest, so consider capturing candid moments of beachgoers enjoying the paradise.
Gear Recommendations: A wide-angle lens (16-35mm) is essential. A polarizing filter will reduce glare and enhance the colors of the water and sky. A tripod is helpful for steady shots, especially during the low light of sunrise and sunset. Consider bringing a drone for aerial perspectives of the beach and lagoon.
Pro Tip: Walk a little further down Matira Beach to find more secluded spots and avoid the crowds near the main entrance. Explore the different angles; sometimes, a slightly different perspective can make all the difference.
Mount Otemanu: Majestic Peak Photography
Dominating the Bora Bora skyline, Mount Otemanu offers unparalleled photographic opportunities. While you can’t hike to the very top (the summit is considered sacred and is very dangerous), there are several vantage points that provide spectacular views.
Vaitape: The island’s main town, Vaitape, offers decent views of Mount Otemanu rising above the houses and trees. It’s a good place to capture the mountain in the context of island life.
Helicopter Tour: For the ultimate Mount Otemanu photography experience, consider a helicopter tour. This will give you unobstructed aerial views of the peak, the lagoon, and the surrounding motus (small islands). Helicopter tours typically range from $300-$600 USD per person, depending on the duration.
Boat Tours: Many boat tours around Bora Bora offer excellent views of Mount Otemanu from the water. These tours often include stops for snorkeling and swimming, providing a variety of photographic opportunities. Look for tours that specifically mention views of Mount Otemanu. Prices range from $100-$300 USD per person, depending on the type of tour and duration.
Motu Tapu: This small, privately owned island is often featured in promotional materials for Bora Bora. While access is limited and often requires booking a private tour (expect to pay upwards of $500 USD), the views of Mount Otemanu from here are extraordinary, offering a unique perspective with the island’s lush vegetation in the foreground.
Best Time to Shoot: The golden hours (sunrise and sunset) are ideal for capturing Mount Otemanu. However, midday can also work well if the sky is clear and the light is bright. A polarizing filter will help reduce glare and enhance the colors.
What to Shoot: Focus on capturing the mountain’s dramatic shape and textures. Experiment with different compositions, using foreground elements to add depth and interest. If you’re on a boat tour, try capturing the mountain reflected in the calm waters of the lagoon.
Gear Recommendations: A telephoto lens (70-200mm or longer) will allow you to isolate the mountain and compress the perspective. A wide-angle lens is useful for capturing the mountain within its broader environment. If you’re shooting from a boat, a stabilizer (either in your lens or camera body) will help reduce motion blur.
Pro Tip: Check the weather forecast before planning your Mount Otemanu shoot. Clouds can obscure the peak, especially in the afternoon. Consider booking a helicopter tour earlier in the day for the best chance of clear skies.
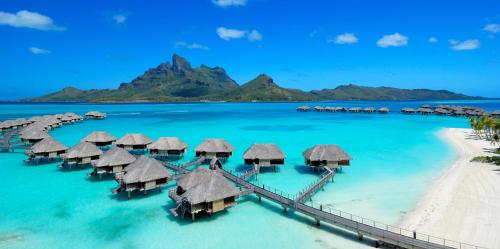
Overwater Bungalows: Iconic Bora Bora Shots
The overwater bungalow is synonymous with Bora Bora luxury, and photographing them is a must. These structures offer a unique vantage point and a quintessential Bora Bora experience. However, be aware that access is restricted to guests staying at the resorts.
Four Seasons Resort Bora Bora: Known for its exceptional service and stunning bungalows, the Four Seasons provides countless photographic opportunities. From sunrise over the lagoon to sunset silhouettes of Mount Otemanu, every angle is picture-perfect. Room rates start at around $1,500 USD per night.
Four Seasons Resort Bora Bora
St. Regis Bora Bora Resort: Another top-tier resort, the St. Regis offers luxurious overwater bungalows with breathtaking views. Be sure to capture the iconic view of Mount Otemanu framed by the resort’s architecture. Expect to pay upwards of $1,200 USD per night.
InterContinental Bora Bora Resort & Thalasso Spa: This resort offers a more secluded location with stunning views of the lagoon and Mount Otemanu. The overwater bungalows are spacious and well-appointed, providing ample opportunities for photography. Prices typically start around $800 USD per night.

InterContinental Bora Bora Resort
What to Shoot: Focus on capturing the bungalows themselves, the stunning views from the decks, and the turquoise water beneath. Use the bungalows to frame Mount Otemanu or the surrounding motus. Don’t forget capturing the interior of the bungalows. The architecture is often integrated to the scenery that provide access to the beautiful ocean life.
Best Time to Shoot: Each resort has unique orientations, so the best time depends on your specific location. Generally, sunrise is ideal for shooting towards the east, and sunset is best for shooting towards the west. The midday sun can be harsh, but you can use it to your advantage by shooting down into the water, capturing the vibrant colors and marine life.
Gear Recommendations: A wide-angle lens is essential for capturing the scale of the bungalows and the surrounding landscape. A telephoto lens is useful for isolating specific details or compressing the perspective. A drone can provide stunning aerial views of the bungalows and the lagoon.
Pro Tip: Take advantage of the resort’s amenities, such as kayaks or paddleboards, to get different perspectives of the bungalows. Talk to the resort staff; they may have recommendations for the best photo spots. Also, keep an eye out for interesting wildlife around the bungalows, such as reef sharks, rays, and colorful fish.
The Lagoon: Underwater Photography & Snorkeling Spots
Bora Bora’s lagoon is a vibrant ecosystem teeming with marine life. Underwater photography and snorkeling are essential experiences for any photographer visiting the island. Several spots offer excellent opportunities to capture the underwater beauty.
Coral Gardens: Located near Motu Piti Aau, the Coral Gardens is a shallow snorkeling spot with an abundance of colorful coral and fish. This is a great place for beginners to practice their underwater photography skills. Many boat tours include a stop at the Coral Gardens.
Motu Tane: Known for its pristine waters and diverse marine life, Motu Tane offers excellent snorkeling and diving opportunities. You can often see reef sharks, rays, and a variety of tropical fish. Access to Motu Tane is typically through private boat tours.
Tapu Dive Site: For experienced divers, the Tapu dive site offers the chance to see larger marine animals, such as lemon sharks, blacktip reef sharks, and manta rays. Several dive operators on Bora Bora offer guided dives to this site. The cost is typically around $150-$200 USD per dive.
Best Time to Shoot: The best time for underwater photography is during periods of high tide and calm weather. Avoid shooting after heavy rain, as the water can become cloudy. Midday is generally the best time for clear visibility, as the sun is directly overhead.
What to Shoot: Focus on capturing the colorful coral, the diverse fish species, and the graceful movements of rays and sharks. Experiment with different angles and compositions. Try capturing the sunlight filtering through the water.
Gear Recommendations: An underwater camera or a waterproof housing for your existing camera is essential. A wide-angle lens will allow you to capture a wider field of view underwater. A strobe or underwater flash will help to illuminate the subject and bring out the colors.
Pro Tip: Practice your snorkeling or diving skills before attempting underwater photography. Be aware of your surroundings and avoid touching or disturbing the coral. Use a red filter to correct for the loss of red light underwater. Remember that safety is the most important aspect of your dive.
Motus (Small Islands): Hidden Gems and Unique Perspectives
The motus surrounding Bora Bora offer a unique perspective on the island and its lagoon. Often less crowded than the main island, these small islands provide hidden gems and tranquil settings for photography.
Motu Piti Aau: Located near the Sofitel Bora Bora Marara Beach Resort, Motu Piti Aau offers stunning views of Mount Otemanu and the lagoon. The Coral Gardens, mentioned earlier, is also located near this motu. You can reach Motu Piti Aau by boat or kayak.
Motu Tofari: This uninhabited motu is known for its pristine beaches and clear waters. It’s a great place for snorkeling, swimming, and simply relaxing. You can reach Motu Tofari by boat or water taxi.
Motu Ahuna: A more remote motu, Motu Ahuna offers a secluded escape from the crowds. It’s a great place for birdwatching and enjoying the natural beauty of Bora Bora. Access is typically through private boat charters. Expect to pay more than $400 for half a day.
Best Time to Shoot: The golden hours (sunrise and sunset) are ideal for capturing the motus. The soft light bathes the islands in warm tones, creating a tranquil and romantic atmosphere. Midday can also work well if the sky is clear and the light is bright.
What to Shoot: Focus on capturing the pristine beaches, the lush vegetation, and the stunning views of Mount Otemanu. Use foreground elements, such as palm trees, rocks, or driftwood, to add depth and interest to your compositions. Don’t forget to capture the reflections in the water.
Gear Recommendations: A wide-angle lens is essential for capturing the broad landscapes. A telephoto lens is useful for isolating specific details or compressing the perspective. A drone can provide stunning aerial views of the motus and the lagoon.
Pro Tip: Pack plenty of water, sunscreen, and insect repellent when visiting the motus. Respect the environment and avoid leaving any trash behind. Consider bringing a picnic lunch to enjoy on the beach.
Beyond the Beaches: Exploring the Interior
While Bora Bora is famous for its beaches and lagoon, the interior of the island offers its own unique photographic opportunities. Renting a car or scooter is the best way to explore the interior.
Farepiti Wharf: Located in Vaitape, Farepiti Wharf is a bustling hub of activity where you can observe local life and capture candid moments of islanders going about their daily routines. It is an authentic insight to the local industry and way of life.
Paro Valley: This lush valley offers stunning views of Mount Otemanu and the surrounding landscape. It’s a great place for hiking and exploring the island’s natural beauty.
World War II Cannons: Relics from World War II, these cannons offer a glimpse into Bora Bora’s history. They are located on a hilltop overlooking the lagoon.
Best Time to Shoot: The golden hours (sunrise and sunset) are ideal for capturing the interior landscape. However, midday can also work well if the sky is clear and the light is bright. Be prepared for changing weather conditions, as rain showers are common in the interior.
What to Shoot: Focus on capturing the lush vegetation, the dramatic landscapes, and the historical landmarks. Use foreground elements, such as trees, rocks, or flowers, to add depth and interest to your compositions. Don’t forget to capture the local life and culture.
Gear Recommendations: A wide-angle lens is essential for capturing the broad landscapes. A telephoto lens is useful for isolating specific details or compressing the perspective. A tripod is helpful for steady shots, especially during the low light of sunrise and sunset.
Pro Tip: Respect the local culture and traditions. Ask for permission before photographing people. Be aware of your surroundings and avoid trespassing on private property.
Practical Tips for Photographing in Bora Bora
Beyond specific locations, there are some general tips that will help you capture better photos in Bora Bora. These relate to equipment safety, weather adaptation and the overall experience.
Protect Your Gear: The tropical environment of Bora Bora can be harsh on camera equipment. Saltwater, humidity, and sand can damage your gear. Invest in waterproof bags, lens cloths, and silica gel packets to protect your equipment. Clean your gear regularly, especially after shooting near the water.
Adapt to the Weather: Bora Bora’s weather can be unpredictable. Be prepared for sunshine, rain, and clouds. Bring a rain cover for your camera and a waterproof jacket for yourself. Check the weather forecast before heading out for a shoot.
Shoot in RAW: Shooting in RAW format will give you more flexibility when editing your photos. RAW files contain more data than JPEG files, allowing you to make more significant adjustments to exposure, white balance, and other settings.
Learn Basic Polynesian Phrases: A simple “Ia Orana” (hello) or “Mauruuru” (thank you) can go a long way in building rapport with locals.
Be Respectful: Bora Bora is a sacred place for the Polynesian people. Be respectful of the local culture and traditions. Ask for permission before photographing people. Avoid trespassing on private property. Dress modestly when visiting villages or religious sites.
Embrace the Island Time: Things move at a slower pace in Bora Bora. Relax, take your time, and enjoy the experience. Don’t rush your photography; instead, allow yourself to be inspired by the beauty of the island.
FAQ Section
What is the best time of year to photograph Bora Bora?
The dry season, from May to October, is generally considered the best time to visit Bora Bora for photography. The weather is sunny and dry, with clear skies and calm waters. However, this is also the peak tourist season, so expect higher prices and more crowds. The shoulder seasons, April and November, can also be good options, offering a balance of good weather and fewer crowds.
Do I need any special permits to photograph in Bora Bora?
No, you do not need any special permits to photograph in most public areas of Bora Bora. However, if you plan to photograph on private property, you will need to obtain permission from the owner. This includes resorts, villas, and private motus.
What is the best way to get around Bora Bora?
Renting a car or scooter is the best way to explore the main island of Bora Bora. There are several rental agencies located at the airport and in Vaitape. Taxis are also available, but they can be expensive. To visit the motus, you will need to take a boat tour or water taxi.
What should I pack for a photography trip to Bora Bora?
In addition to your camera gear, you should pack the following items for a photography trip to Bora Bora: sunscreen, insect repellent, a hat, sunglasses, a swimsuit, a waterproof jacket, comfortable shoes, and a travel adapter.
Are there any photography workshops or tours available in Bora Bora?
Yes, there are several photography workshops and tours available in Bora Bora. A quick online search can provide options.
References
Temana Helicopters Bora Bora – https://www.temanahelicopters.com/en/borabora/scenic-flights/
Hopefully, this guide has provided you with the knowledge and inspiration to capture the magic of Bora Bora through your lens. Now, it’s time to turn those dreams into reality. Book your trip, pack your gear, and head to this South Pacific paradise. The turquoise lagoons, dramatic landscapes, and vibrant culture await your photographic eye. Don’t just dream about it – go out there and capture the beauty of Bora Bora!


