Bora Bora, the “Pearl of the Pacific,” is more than just a honeymoon destination; it’s a photographer’s dream. With its iconic Mount Otemanu, vibrant coral reefs, and luxurious overwater bungalows, every angle offers a postcard-worthy shot. This guide reveals the best locations and activities to elevate your Bora Bora photography.
The Quintessential Overwater Bungalow Shot
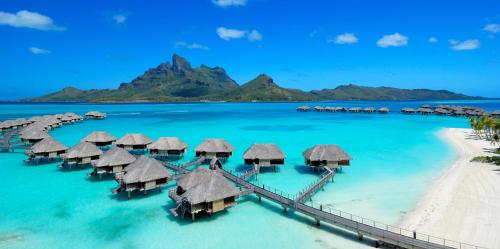
Let’s face it, the overwater bungalow is synonymous with Bora Bora. But capturing that iconic shot requires planning. First, consider the location of your bungalow. Some resorts, like the Four Seasons Resort Bora Bora or the St. Regis Bora Bora Resort, offer bungalows with unobstructed views of Mount Otemanu, crucial for that classic composition. Book in advance, specifying your preference for an Otemanu-facing bungalow. Expect to pay a premium, ranging from approximately $1,500 to upwards of $5,000 per night during peak season.
Four Seasons Resort Bora Bora
Next, think about the time of day. Sunrise offers soft, warm light and fewer people around. The water is usually calm, creating stunning reflections. Golden hour (the hour after sunrise and the hour before sunset) is another excellent option, painting the sky with vibrant colors. If you’re shooting during midday, try to find shade or use a polarizing filter to reduce glare and deepen the colors of the lagoon. Consider using a drone for a unique perspective. Many resorts allow drone photography (check their policies beforehand), providing breathtaking aerial shots of the bungalows and surrounding landscape.
Don’t forget the small details! Capture the reflections on the water, the intricate details of the thatched roofs, or the vibrant colors of the tropical flowers adorning the bungalows. Try different angles – from the end of the dock, from the water (snorkel or swim carefully!), or even from a neighboring bungalow (with permission, of course!).
Snorkeling and Diving: Underwater Wonders
Bora Bora’s underwater world is as captivating as its above-ground scenery. Snorkeling and diving present fantastic opportunities for underwater photography. Popular snorkeling spots include Coral Gardens, known for its vibrant coral formations and diverse marine life. Many tour operators offer snorkeling excursions to this location, typically costing around $75-$150 per person.
For deeper dives, consider spots like Toopua, a submerged volcanic crater teeming with marine life. Several dive centers in Bora Bora offer guided dives for certified divers, with prices ranging from $150-$300 per dive, depending on the location and duration. Ensure you have the appropriate underwater camera housing for your camera. Options range from affordable waterproof cases for smartphones to professional-grade housings for DSLRs and mirrorless cameras, costing anywhere from $50 to several thousand dollars.
When shooting underwater, remember these tips: get close to your subject to minimize the amount of water between you and the subject, which improves clarity and reduces distortion. Use a red filter to compensate for the loss of red light underwater, which is absorbed quickly. A strobe or underwater flash can also help to illuminate your subject and bring out its true colors. Be mindful of your buoyancy and avoid touching or disturbing the coral reefs. The delicate ecosystems are protected, and disturbing them can have lasting impacts.
Mount Otemanu: Majestic Views from Land and Sea
Mount Otemanu dominates the Bora Bora skyline, providing a stunning backdrop for photography. The best way to capture its grandeur is from a distance, allowing you to showcase its scale and beauty. Beaches along Matira Point offer excellent vantage points. The soft white sand and turquoise waters in the foreground create a striking contrast with the rugged mountain peak.
Consider taking a boat tour around the island. Many tours include stops at various viewpoints, offering unobstructed views of Mount Otemanu from different angles. These tours typically cost around $80-$200 per person. Alternatively, rent a car and explore the island at your own pace, stopping at scenic overlooks along the way. Be aware that some roads are unpaved and may require a 4×4 vehicle.
For adventurous photographers, consider hiking part of Mount Otemanu. While the summit is inaccessible due to its steep and rocky terrain, guided hiking tours are available that take you to viewpoints offering panoramic views of the island and lagoon. These hikes can be challenging and require a good level of fitness, but the rewards are well worth the effort. Expect to pay around $150-$300 per person for a guided hike.
Lagoonarium: Sharks, Rays, and More
A visit to a lagoonarium offers unique opportunities to photograph sharks, stingrays, and other marine creatures in a controlled environment. Several lagoonariums operate in Bora Bora, offering guided tours and feeding demonstrations. These tours typically cost around $100-$200 per person and provide a chance to get up close and personal with these magnificent animals.
When photographing sharks and rays, remember to use a fast shutter speed to freeze their movement. Be respectful of the animals and avoid using flash photography, which can startle them. A wide-angle lens is ideal for capturing the entire scene, including the marine life and the surrounding lagoon. Consider using an underwater camera or housing for your camera to protect it from the water.
Island Hopping: Exploring the Motus
Bora Bora is surrounded by several smaller islands, known as motus. These motus offer secluded beaches, pristine waters, and unique perspectives of Bora Bora. Consider taking a boat trip to one of the motus for a day of relaxation and photography. Many boat tours include stops at several motus, allowing you to explore different parts of the lagoon. These tours typically cost around $100-$250 per person.
Motu Tapu is a particularly popular choice, known for its iconic swing hanging over the water. Capture the swing with Mount Otemanu in the background for a classic Bora Bora shot. Motu Picnic also offers stunning views and a more secluded experience. Explore the beaches, snorkel in the crystal-clear waters, and capture the beauty of these untouched islands.
The Colors of Vaitape: Capturing Local Life
Vaitape is the main town in Bora Bora, offering a glimpse into local life. While it might not have the glamorous appeal of the resorts, Vaitape provides opportunities to capture authentic scenes and unique perspectives. Visit the local market and capture the vibrant colors of the fresh produce, flowers, and handicrafts. Interact with the locals (respectfully, of course!) and capture their portraits.
Explore the streets and capture the colorful buildings, local shops, and traditional Polynesian architecture. Be mindful of your surroundings and respect the local culture. Ask for permission before photographing people. The best time to visit Vaitape for photography is in the morning or late afternoon when the light is softer and more flattering.
Sunset Spectacles: End the Day in Style
Sunsets in Bora Bora are legendary. The sky transforms into a canvas of vibrant colors, reflecting on the lagoon and creating a breathtaking spectacle. Find a good vantage point and capture the magic. Matira Point is a popular spot for sunset photography, offering unobstructed views of the western horizon. Overwater bungalows also provide excellent views, allowing you to capture the sunset from the comfort of your own private deck.
Consider taking a sunset cruise for a unique perspective. Many boat tours offer sunset cruises, providing a romantic and unforgettable experience. These cruises typically include drinks and snacks, allowing you to relax and enjoy the show. Remember to bring a tripod to capture sharp images in low light. Experiment with different shutter speeds to capture the motion of the clouds and water. Use a wide-angle lens to capture the entire scene, or zoom in with a telephoto lens to capture the details of the sunset.
Night Photography: Stars Over Paradise
Bora Bora’s remote location and lack of light pollution make it an ideal destination for astrophotography. On a clear night, the sky comes alive with a dazzling display of stars. Find a dark location away from artificial light sources and set up your camera on a tripod. Matira Point, away from the resorts, can offer a good viewing location. A wide-angle lens is essential for capturing the expanse of the night sky.
Use a long exposure (typically 15-30 seconds) to capture the stars. A high ISO (typically 800-3200) may be necessary to capture enough light. Be aware of the star trails caused by the Earth’s rotation. To minimize star trails, use a shorter exposure time or use a star tracker. Capture the Milky Way arching across the sky or the constellations twinkling above Mount Otemanu. Night photography requires patience and experimentation, but the results can be truly rewarding.
Practical Tips for Photography in Bora Bora
- Protect Your Equipment: The tropical climate can be harsh on your equipment. Use waterproof bags or cases to protect your camera and lenses from moisture, salt spray, and sand. Consider investing in a lens cleaning kit to remove dust and water spots.
- Pack Extra Batteries and Memory Cards: You don’t want to run out of power or storage space in the middle of a photoshoot. Bring extra batteries and memory cards to ensure you can capture all the amazing moments.
- Use a Polarizing Filter: A polarizing filter can reduce glare, deepen colors, and improve contrast, especially when shooting water and skies.
- Get Up Early: The best light for photography is often in the early morning. Get up before sunrise to capture the soft, warm light and avoid the crowds.
- Stay Hydrated and Wear Sunscreen: The sun in Bora Bora can be intense. Drink plenty of water and wear sunscreen to protect yourself from sunburn and dehydration.
- Respect the Local Culture: Be mindful of the local culture and customs. Ask for permission before photographing people and avoid trespassing on private property.
- Edit Your Photos: Use photo editing software to enhance your images and bring out their full potential. Adjust the exposure, contrast, and colors to create stunning results.
Gear Recommendations
While you can capture incredible photos with just a smartphone, having dedicated photography gear can elevate your results. Here are some recommendations:
- Camera: A DSLR or mirrorless camera offers the best image quality and versatility. Consider models like the Sony Alpha series, Canon EOS series, or Nikon Z series.
- Lenses: A wide-angle lens (e.g., 16-35mm) is essential for landscapes and underwater photography. A telephoto lens (e.g., 70-200mm) is great for capturing distant subjects and wildlife. A versatile zoom lens (e.g., 24-70mm) is a good all-around option.
- Underwater Housing: If you plan on doing a lot of snorkeling or diving photography, invest in a good underwater housing for your camera.
- Tripod: A tripod is essential for landscape photography, especially in low light.
- Drone: A drone can provide unique aerial perspectives of Bora Bora.
- Filters: Polarizing and neutral density (ND) filters can enhance your images and allow you to shoot in challenging lighting conditions.
Cost Considerations
Bora Bora is a luxury destination, and photography-related expenses can add up quickly. Here’s a breakdown of potential costs:
- Accommodation: Overwater bungalows range from $1,500 to over $5,000 per night.
- Activities: Snorkeling and diving tours range from $75 to $300 per person. Boat tours range from $80 to $250 per person.
- Gear: Underwater housings range from $50 to several thousand dollars. Drones range from $500 to several thousand dollars.
- Transportation: Car rentals range from $50 to $150 per day. Taxis are expensive.
- Food and Drinks: Meals at resorts can be very expensive. Consider eating at local restaurants or buying groceries to save money.
Budget Tip: Consider traveling during the shoulder season (April-May or September-October) to save money on accommodation and flights. Pack your own snacks and drinks to avoid paying resort prices. Look for free activities, such as hiking and beachcombing.
Getting Around Bora Bora
Bora Bora is a small island, but getting around can be challenging and expensive. Here are some transportation options:
- Taxi: Taxis are readily available, but they can be expensive. Agree on a price before you get in.
- Rental Car: Renting a car gives you the freedom to explore the island at your own pace. However, some roads are unpaved and may require a 4×4 vehicle.
- Scooter: Renting a scooter is a more affordable option, but it can be dangerous on the unpaved roads.
- Boat: Many activities involve boat transportation. Consider using a boat to explore the lagoon and visit the motus.
- Walking: Walking is a great way to explore the town of Vaitape and the beaches. However, be aware that the island can be very hot and humid.
Accommodation Style Recommendations
- Overwater Bungalow: Stay in an Otemanu-facing bungalow at Four Seasons or St. Regis for iconic views.
- Beachfront Villa: Choose a villa near Matira Point for easy access to sunset photography spots. Some properties offer direct beach access for sunrise shots.
- Budget-Friendly Option: Select a smaller hotel or guesthouse in Vaitape to save on costs. While lacking the resort amenities, you can explore the island’s culture and get around using public transportation.
FAQ Section
What is the best time of year to visit Bora Bora for photography?
The best time to visit Bora Bora for photography is during the shoulder seasons (April-May and September-October). The weather is generally good, with less rain and humidity than the peak season (June-August). The crowds are also smaller, and prices are lower.
What equipment do I need for underwater photography in Bora Bora?
For serious underwater photography, you’ll need an underwater housing for your camera. You can also use a GoPro or other action camera with a waterproof case. Consider using a red filter to compensate for the loss of red light underwater. A strobe or underwater flash can also help to illuminate your subject.
Are drones allowed in Bora Bora?
Drone regulations in Bora Bora can be strict. It’s important to check the local laws and regulations before flying a drone. Some resorts may have their own drone policies. Fly responsibly and be respectful of other people and the environment.
How can I capture the Milky Way in Bora Bora?
To capture the Milky Way, you’ll need a dark location away from artificial light sources. Use a wide-angle lens, a tripod, and a long exposure (typically 15-30 seconds). A high ISO (typically 800-3200) may be necessary to capture enough light. Use a star tracking app to find the Milky Way in the night sky. Be patient and experiment with different settings to get the best results.
What are some ethical considerations for photographing in Bora Bora?
Respect the local culture and customs. Ask for permission before photographing people. Avoid trespassing on private property. Be mindful of the environment and avoid damaging or disturbing the coral reefs and other natural habitats. Fly drones responsibly and be respectful of other people and the environment.
References
- Four Seasons Resort Bora Bora Official Website
- St. Regis Bora Bora Resort Official Website
- Bora Bora Tourism Board Official Website (If available, check regional tourism policies)
Ready to capture the magic of Bora Bora? Don’t just dream about it – book your trip today and start planning your photographic adventure! Research flights and accommodation, pack your camera gear, and prepare to be amazed by the beauty of the “Pearl of the Pacific.” Share your photos with the world and inspire others to experience the wonders of Bora Bora.


")