Bora Bora, a name synonymous with turquoise dreams and postcard-perfect landscapes, offers a photographer’s paradise waiting to be captured. The island’s unique topography, vibrant marine life, and ever-changing light create a symphony of colors that will challenge and inspire even the most seasoned photographer. This guide breaks down the best spots, times, and techniques to ensure you leave Bora Bora with a collection of stunning images.
Matira Beach: Sunset Serenity and Crystal-Clear Waters
Matira Beach, often ranked among the world’s most beautiful beaches, is a must-visit for any photographer in Bora Bora. Its soft, white sand and shallow, crystal-clear waters create the ideal conditions for capturing breathtaking sunset shots. Arrive at least an hour before sunset to scout for the perfect composition. Consider including the iconic outrigger canoes that often dot the shoreline to add a touch of Polynesian authenticity.
Timing: Sunset at Matira Beach is magical. Arrive early (around 4:00 PM, depending on the season) to secure a good spot and experiment with different compositions as the light changes. The “golden hour,” the period shortly after sunrise or before sunset, offers the most flattering and warm light.
Gear: A wide-angle lens (16-35mm) is great for capturing the expansive beach and sky. A telephoto lens (70-200mm) can compress the distance and highlight the vibrant colors of the sunset reflecting off the water. Don’t forget a tripod for sharp, long-exposure shots during the low light of sunset. A polarizing filter can help reduce glare and enhance the colors of the water and sky.
Composition Tips: Use leading lines, such as the curve of the beach or the line of coconut trees, to guide the viewer’s eye into the scene. Experiment with different perspectives – get low to the ground to emphasize the foreground, or climb onto a slightly elevated position (if available) for a wider view. Including people in your shots can add a sense of scale and human interest.
Accessibility and Cost: Matira Beach is a public beach, so access is free. It’s easily accessible by taxi, scooter, or rental car. The roads are well-maintained, and parking is available near the beach.
Pro tip: Bring a dry bag to protect your camera equipment from splashes and sand. Consider staying at a nearby hotel for easy access to the beach throughout the day.
Mount Otemanu: Majestic Views and Dramatic Light
Mount Otemanu, the iconic volcanic peak that dominates Bora Bora’s skyline, provides a stunning backdrop for photographs. While climbing to the very top is not possible without specialized equipment and a guide (due to its steep and crumbly slopes), there are numerous vantage points around the island that offer spectacular views.
Vantage Points:
- From the water: Boat tours and excursions offer some of the best views of Mount Otemanu. The perspective from the lagoon provides a unique angle of the peak against the turquoise water.
- InterContinental Bora Bora Le Moana Resort: This resort offers fantastic views of Mount Otemanu, especially from its overwater bungalows. You don’t necessarily have to be a guest to capture stunning shots; consider dining at one of the resort’s restaurants or enjoying a drink at the bar for a chance to photograph the mountain.
- Roadside viewpoints: The main road that circles the island offers several viewpoints where you can pull over and capture the mountain. Look for small parking areas or widened sections of the road.
Timing: The best time to photograph Mount Otemanu is during the early morning or late afternoon, when the light is soft and golden. Midday sun can create harsh shadows and make it difficult to capture detail. Cloudy days can also be advantageous, as the clouds can add drama and texture to the sky.
Gear: A telephoto lens (70-200mm or longer) is essential for capturing the details of the mountain’s rugged peaks and textures. A wide-angle lens can be used to capture the mountain in context with the surrounding landscape. A polarizing filter can help reduce haze and enhance the colors of the sky and water.
Composition Tips: Use the rule of thirds to create a balanced and visually appealing composition. Position Mount Otemanu off-center, with the surrounding lagoon or vegetation filling the other two-thirds of the frame. Look for interesting foreground elements, such as palm trees or boats, to add depth and interest to your shots.
Accessibility and Cost: Access to roadside viewpoints is free. Boat tours and excursions range in price from around $100 to $300 per person, depending on the duration and inclusions. Dining or having drinks at the InterContinental Bora Bora Le Moana Resort will incur a cost, but it may be worth it for the stunning views.
Pro Tip: Pay attention to the weather forecast. A clear day with a few puffy clouds is ideal for photographing Mount Otemanu. Be prepared for changing conditions, as the weather in Bora Bora can be unpredictable.
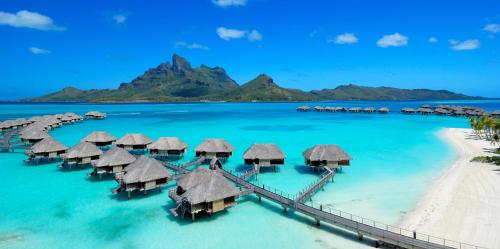
Overwater Bungalows: Iconic Luxury and Turquoise Views
Bora Bora’s overwater bungalows are synonymous with luxury and provide unique photographic opportunities. Whether you’re staying in one or simply admiring them from afar, they offer stunning perspectives of the lagoon and surrounding landscape.
Best Resorts for Photography:
- The St. Regis Bora Bora Resort: Known for its luxurious bungalows and stunning views of Mount Otemanu.
- Four Seasons Resort Bora Bora: Offers a blend of Polynesian tradition and modern luxury, with beautiful overwater bungalows and pristine beaches.
- InterContinental Bora Bora Resort & Thalasso Spa: Features overwater bungalows with glass floors, providing unique opportunities to photograph the marine life below.
Four Seasons Resort Bora Bora
Timing: The light is best during the golden hour (sunrise and sunset). The soft, warm light creates a romantic and dreamy atmosphere, perfect for capturing the beauty of the bungalows and the surrounding lagoon. Midday sun can be harsh, so try to avoid shooting during this time.
Gear: A wide-angle lens (16-35mm) is ideal for capturing the expansive views from the overwater bungalows. A drone (if permitted by the resort and local regulations) can provide a bird’s-eye view of the bungalows and the lagoon. A polarizing filter can help reduce glare and enhance the colors of the water and sky.
Composition Tips: Use leading lines, such as the boardwalks that connect the bungalows, to guide the viewer’s eye into the scene. Experiment with different angles and perspectives to find the most flattering view of the bungalows. Include elements that convey a sense of luxury and relaxation, such as couples lounging on their decks or enjoying a sunset cocktail.
Accessibility and Cost: Staying in an overwater bungalow can be expensive, with nightly rates ranging from $800 to several thousand dollars. However, even if you’re not staying in one, you can still capture beautiful shots of the bungalows from the beach or from a boat tour.
Pro Tip: If you’re staying in a bungalow, take advantage of the opportunity to photograph the underwater world from your deck, especially if your bungalow has a glass floor. Coordinate with your resort to arrange for a private boat tour or photo shoot.
The Coral Gardens: Underwater Wonders
Bora Bora’s coral gardens are teeming with colorful marine life, offering incredible opportunities for underwater photography. Snorkeling or diving in these vibrant ecosystems is a must for any underwater enthusiast.
Best Coral Garden Locations:
- Coral Gardens near the Sofitel Bora Bora Marara Beach Resort: Known for its diverse coral formations and abundant fish.
- The lagoonarium: Located at the InterContinental Bora Bora Resort & Thalasso Spa, this enclosed lagoon offers a safe and controlled environment for snorkeling and underwater photography.
- Private Motu Coral Gardens: Many local tour operators offer excursions to private motus (small islands) with pristine coral gardens.

InterContinental Bora Bora Resort
Timing: The best time for underwater photography is during the morning hours, when the light is brightest and the water is clearest. Visibility can be affected by weather conditions, so check the forecast before heading out. Avoid snorkeling or diving after heavy rainfall, as the runoff can cloud the water.
Gear: An underwater camera or a waterproof housing for your existing camera is essential. A GoPro or other action camera is a good option for beginners, while more experienced photographers may prefer a dedicated underwater camera with advanced features. A strobe or underwater light can help illuminate the subject and bring out the colors of the coral and fish. A red filter can also help restore the natural colors that are lost at depth.
Composition Tips: Get close to your subject to capture the details of the coral and fish. Use a wide-angle lens to capture the expansive scene. Experiment with different angles and perspectives to create interesting compositions. Pay attention to the light and try to position yourself so that the sun is behind you, illuminating the subject.
Accessibility and Cost: Snorkeling tours range in price from around $50 to $150 per person, depending on the duration and inclusions. Diving excursions are more expensive, typically costing between $150 and $300 per person. The cost of underwater camera equipment can vary widely, from a few hundred dollars for a basic setup to several thousand dollars for professional gear.
Pro Tip: Practice using your underwater camera in a pool or shallow water before venturing into the ocean. Be aware of your surroundings and avoid touching or disturbing the coral. Respect the marine life and avoid chasing or harassing the animals.
The Lagoon: Colors Like Nowhere Else
Bora Bora’s lagoon, a shimmering expanse of turquoise and sapphire hues, is the heart of the island’s beauty. Capturing the lagoon’s vibrant colors and diverse marine life is a rewarding challenge for any photographer.
Best Ways to Explore the Lagoon:
- Boat Tours: Offer a wide range of options, from morning snorkeling excursions to sunset cruises.
- Jet Ski Tours: Provide a thrilling way to explore the lagoon and its hidden coves.
- Outrigger Canoe Tours: Offer a traditional Polynesian experience and a unique perspective of the lagoon.
- Paddleboarding and Kayaking: Allow you to explore the lagoon at your own pace and get up close to the marine life.
Timing: The colors of the lagoon are most vibrant during the midday hours, when the sun is high in the sky. However, the light can be harsh during this time, so it’s important to use a polarizing filter to reduce glare and enhance the colors. The golden hour (sunrise and sunset) can also offer beautiful lighting conditions, creating a softer and more romantic atmosphere.
Gear: A wide-angle lens (16-35mm) is ideal for capturing the expansive views of the lagoon. A telephoto lens (70-200mm) can be used to zoom in on specific details, such as the colorful fish or the distant islands. A drone (if permitted) can provide a bird’s-eye view of the lagoon and its intricate patterns. A polarizing filter is essential for reducing glare and enhancing the colors of the water.
Composition Tips: Use the rule of thirds to create a balanced and visually appealing composition. Include elements that convey a sense of scale, such as boats or people. Look for interesting patterns and textures in the water. Experiment with different shutter speeds to create different effects. A slow shutter speed can blur the water, creating a sense of motion, while a fast shutter speed can freeze the action.
Accessibility and Cost: Boat tours range in price from around $50 to $300 per person, depending on the duration and inclusions. Jet ski tours are typically more expensive, costing between $200 and $400 per person. Paddleboarding and kayaking rentals are relatively affordable, costing around $20 to $50 per hour.
Pro Tip: Bring a waterproof bag to protect your camera equipment from splashes. Wear sunscreen and a hat to protect yourself from the sun. Be aware of the tides and currents, and avoid venturing too far from shore.
The Motus: Idyllic Escapes
Bora Bora is surrounded by a string of idyllic motus (small islands), each offering its own unique charm and photographic opportunities. These secluded escapes are perfect for capturing the essence of Polynesian paradise.
Notable Motus:
- Motu Tapu: One of the most photographed motus in Bora Bora, known for its pristine beach and crystal-clear waters.
- Motu Toopua: A private motu that is home to the Sofitel Bora Bora Private Island resort, offering stunning views of Mount Otemanu.
- Motu Pitio U’uta (also known as Coco Beach): Popular for its laid-back atmosphere, delicious food, and beautiful lagoon.

Sofitel Bora Bora Private Island Resort
Timing: The best time to photograph the motus is during the morning or late afternoon, when the light is soft and golden. Sunrise and sunset can be particularly magical, casting a warm glow over the islands and the surrounding lagoon.
Gear: A wide-angle lens is ideal for capturing the expansive views of the motus and the surrounding lagoon. A telephoto lens can be used to zoom in on specific details, such as the palm trees or the thatched-roof bungalows. A drone (if permitted) can provide a bird’s-eye view of the motus and their intricate shapes.
Composition Tips: Use the rule of thirds to create a balanced and visually appealing composition. Include elements that convey a sense of scale, such as people or boats. Look for interesting patterns and textures in the sand and vegetation. Experiment with different perspectives to find the most flattering view of the motus.
Accessibility and Cost: Access to the motus is typically by boat. Many tour operators offer excursions to the motus, ranging in price from around $50 to $300 per person, depending on the duration and inclusions. Some motus, such as Motu Toopua (Sofitel Private Island), require a stay at the resort for access.
Pro Tip: Check with your hotel or tour operator about the availability of excursions to the motus. Be sure to bring sunscreen, a hat, and plenty of water. Respect the environment and avoid littering.
Vaitape: Capturing Local Life
While Bora Bora is renowned for its luxury resorts and stunning landscapes, the island’s main town, Vaitape, offers a glimpse into the authentic Polynesian life. Exploring Vaitape provides an opportunity to capture the everyday moments and cultural richness of Bora Bora.
Things to Photograph in Vaitape:
- The colorful local market: A vibrant hub of activity, where you can photograph fresh produce, local crafts, and friendly vendors.
- The harbor: Watch the fishing boats come and go, and capture the hustle and bustle of the waterfront.
- The local church: A simple yet beautiful structure, often adorned with flowers and traditional Polynesian decorations.
- The main street: Capture the charm of the town with its quaint shops, restaurants, and cafes.
- Local people: With their permission, of course, capturing the portraits of locals is the best way to remember your travel.
Timing: The market is most vibrant in the morning, when the vendors are setting up their stalls and the locals are doing their shopping. The harbor is active throughout the day, but the light is best during the morning and late afternoon. The church is beautiful at any time of day, but it’s particularly stunning during sunset, when the light reflects off its white walls.
Gear: A versatile zoom lens (24-70mm or 24-105mm) is ideal for capturing the diverse scenes in Vaitape. A prime lens (35mm or 50mm) can be used for street photography and portraits. A tripod may be useful for capturing long-exposure shots in the harbor or low-light shots in the church.
Composition Tips: Be respectful of the local people and their culture. Ask for permission before taking photographs of individuals. Look for interesting details and textures in the buildings and streets. Use the rule of thirds to create a balanced and visually appealing composition. Capture the energy and atmosphere of the town with your photographs.
Accessibility and Cost: Vaitape is easily accessible by taxi, scooter, or rental car. There is no cost to enter the town or visit the market. However, you may want to purchase some local crafts or souvenirs to support the local economy.
Pro Tip: Learn a few basic phrases in French or Tahitian to communicate with the locals. Be open to new experiences and embrace the local culture. Take your time to explore the town and discover its hidden gems.
Practical Tips for Photographing Bora Bora
Beyond specific locations, keep these essential tips in mind to maximize your photographic potential in Bora Bora:
- Protect your equipment: The tropical climate can be harsh on camera gear. Invest in a good quality camera bag that is waterproof and dustproof. Use silica gel packets to absorb moisture and prevent fungus growth. Clean your lenses regularly to remove salt spray and dust.
- Plan your shots: Research the best locations and times for photography in advance. Use a photography planning app, such as PhotoPills, to calculate the sunrise and sunset times and angles. Scout your locations in advance to identify the best viewpoints and compositions.
- Be patient: The best light and weather conditions may not always be available when you want them. Be patient and persistent, and don’t be afraid to return to a location multiple times to capture the perfect shot.
- Embrace the unexpected: Sometimes, the most memorable photographs are the ones that you didn’t plan. Be open to spontaneous moments and unexpected opportunities. Be willing to experiment and try new things.
- Respect the environment: Bora Bora is a fragile ecosystem. Be mindful of your impact on the environment and avoid disturbing the wildlife or damaging the coral reefs. Pack out all of your trash and dispose of it properly.
FAQ Section: Common Questions About Photographing in Bora Bora
Q: What is the best time of year to visit Bora Bora for photography?
A: The dry season (May to October) is generally considered the best time to visit Bora Bora for photography. The weather is sunny and dry, with clear skies and calm seas. The shoulder season (April and November) can also be a good option, with fewer crowds and lower prices. The wet season (December to March) can be more challenging, with frequent rain and cloudy skies.
Q: Do I need a permit to fly a drone in Bora Bora?
A: Yes, you typically need a permit from the local authorities to fly a drone in Bora Bora. Regulations can change, so it’s best to check with the local authorities or your hotel for the latest requirements. Some resorts may also have restrictions on drone flying on their property.
Q: What kind of power adapter do I need in Bora Bora?
A: Bora Bora uses the French Polynesian standard, which is 220V, 60Hz with European-style plugs (Type C and E). If your devices use a different voltage or plug type, you’ll need a power adapter and possibly a voltage converter.
Q: How can I protect my camera from the salt water spray?
A: Use a waterproof camera bag or case to protect your equipment when you’re near the water. Consider using a lens filter to protect the front element of your lens from salt spray. Wipe down your camera and lenses with a soft, dry cloth after each use.
Q: Is it safe to drink the tap water in Bora Bora?
A: It’s generally not recommended to drink tap water in Bora Bora. Bottled water is readily available at hotels, restaurants, and shops.
Q: How much money should I budget for photography expenses in Bora Bora?
A: The cost of photography expenses in Bora Bora can vary widely depending on your needs and preferences. Factors to consider include the cost of camera equipment, accessories, tour and excursion fees, transportation, and meals and drinks. A reasonable budget for photography expenses could range from a few hundred dollars to several thousand dollars.
References
- Official Tourism Board of French Polynesia
- Local Bora Bora Tour Operators
- Photography Gear Retailer Websites
Ready to transform your Bora Bora memories into captivating images? Don’t just dream about the turquoise paradise – capture it! Start planning your trip today, pack your camera gear, and prepare to be amazed by the vibrant colors and breathtaking beauty that awaits you. Embrace the adventure, experiment with different techniques, and most importantly, have fun! Your photographic journey in Bora Bora starts now.


